Loading...
Loading...
Loading...
Loading...
Loading...
Loading...
Loading...
Loading...
Loading...
Loading...
Loading...
Loading...
Loading...
Loading...
Loading...
Loading...
Loading...
Loading...
Loading...
Loading...
Loading...
Loading...
Loading...
Loading...
Loading...
Loading...
Loading...
Loading...
Loading...
CommandBox allows you to automate common jobs that you want to run via Task Runners. Tasks are for when you want something more flexible than a recipe or just a simple .cfm execution. Tasks are analogous to other build tools like Ant, except you get to use CFML to build them instead of XML! Task runners are the next generation of automation for CFML developers. Now you don't need to learn another tool to improve your workflow. You can automate directly in CFML!
A task is defined as a CFC and can have one or more "targets", which are declared as public methods on the CFC. This gives your task a much more well-defined API than a simple .cfm execution which includes proper arguments, base methods, print helpers, and portability but with very little boilerplate. Task runners operate very similar to custom commands, but instead of needing to be distributed inside a module, they are self contained in the CFC and can be dropped in any folder.
Let's look at how easy it is to write your first task:
That will open the following new file in your default CFML IDE:
Aaaaand, now we run it!
That's it! The code in your run() method will be executed and has access to all the goodies that custom commands get like the print helper for easy ANSI formatting. Check out task run help for additional information on how to call a task CFC of another name, how to invoke another target method, and how to pass parameters to your tasks.
CommandBox> task create --open/**
* Description of task
*/
component {
/**
*
*/
function run() {
print.greenLine( 'Complete!' );
}
}CommandBox> task run
Complete!For a task that has more than one target (method) you can specify dependencies that will run, in the order specified, prior to your final target. Specify task target dependencies as a comma-delimited list in a depends annotation on the target function itself. There is no limit to how many target dependencies you can have, nor how deep they can nest.
component {

  function run() depends="runMeFirst" {
  }

  function runMeFirst() {
  }

}
Given the above Task Runner, typing
task runwould run the runMeFirst() and run() method in that order.
Any parameters passed to the target will also be passed along to methods who are dependencies. Don't forget, task CFCs are re-created every time they are executed as transients, so feel free to borrow the variables scope inside the CFC to share state between methods.
If you have a large list of items you need to output, you can use the print.columns() helper. Pass an array of simple values to be printed, and columns will be created on the screen based on the widest item and the terminal width.
print.columns( directoryList( resolvePath( /lib ) ) )You can also pass a UDF as the second argument which will be called for each item in the array and can return a string with additional formatting text for the print helper to format that item. The closure receives the following arguments:
item (string) being printed
row number
column number
This example would print out a list of files in the directory, coloring all text files blue, and the rest green.
This helper is the same as the printColumns command with the differences being the command accepts no formatting closure and will convert list data into an array or will accept a JSON array directly.
Regardless of whether your task is called with named parameters, positional parameters or boolean flags, you'll access them the same way: via the standard CFML arguments scope. An exception will be thrown if required parameters are not passed, and the defaults you configured will also work just like you expect.
If the parameters were escaped when typed into the command line, you will receive the final unescaped version in your task.
Users can pass named or positional parameters that aren't declared, and they will come through the arguments scope. Named parameters will be accessable as arguments.name
When a task throws an unhandled exception, any output in its print buffer will be flushed to the screen. Then the error message accompanied by a tag stack will be output to the screen and the user will be returned to the prompt.
If an unexpected error happens inside a task that is non-recoverable, do not attempt to try/catch it unless you can improve the error message to something more useful. Generally speaking, just let the error bubble up and be handled by CommandBox for consistency and simplicity.
If there are expected situations such as a file not existing, that you know might go wrong, we wholeheartedly recommend checking for these situations and using the error() method to alert the user. Errors returned from the
Every time you execute a task runner,
Lucee template cache is cleared
WireBox's metadata cache is cleared
Wirebox's mapping for the CFC is unmapped and remapped
This ensure changes take affect right away, but can cause issue under load when you have multi-threaded execution of more than one task at the same time. To skip these cache clearing steps on every run for multi-threaded production use, add the following config setting.
If you have a module installed to a folder that you wish to load into the CLI and use on-the-fly during a task runner, you can do so like this:
That code will load the myUtils module right there into the core CLI. Note, the module needs to be compatible with CommandBox. All models, interceptors, or commands inside the module will instantly be available in the CLI.
This means your task runners can rely on other functionality in the form of modules which are easily distributed and shared. While you could manually install the module globally into the CLI, this method is more flexible and ad-hoc as the module is just temporarily loaded.
If your Task Runner requires a Lucee extension which is not already installed into the Lucee instance that powers the CLI, you will need to install it before you can use it. You can download the lex file and place it inside the deploy folder in the Lucee Server context inside the CLI
The extension will get picked up and installed within 60 seconds if CommandBox is running, or immediately on the next start.
You can also use the installExtension() method which is part of the base Task to install any extension available on an update provider.
Or specify a version like so:
Your task might need to get information about its environment or perhaps proxy to other commands. Here is a handful of useful methods available to all commands.
This method will return the Current Working Directory that the user has changed to via the cd command. The path will be expanded and fully qualified.
To send email, use cfmail tag making sure you set async=false (see below). Not setting this flag to false may result in undelivered email because mail may still exist in Lucee spooler (Lucee tasks) when your task runner exits.
If you cannot connect to a SMTP server that requires SSL or
In CommandBox, a user can cancel a command or task by pressing Ctrl-C. This fires the interrupt handler in the terminal which calls Thread.interrupt() on the Java thread running in CLI. Java's interrupt doesn't kill a thread dead though, it politely asks it to wrap up what it's doing so it doesn't get messy. There are a number of built in CFML functions like sleep() that will automatically check and see if the thread they are executing in has been interrupted. A number of build in CommandBox functions like the print helper also check to see if the thread has been interrupted.
These method throw an InterruptedException which aborts the execution of your task and rolls back to the interactive command prompt. But what if your task is doing a lot of work and it doesn't realize it's been asked to stop? If your task does a very large amount of computations in a loop of some kind, you can periodically check if the user has tried to interrupt you by calling this built in method that is available to all custom commands and Task Runners.
If the current thread hasn't been interrupted, that call will simply return immediately and you can continue with your work. If your thread has been interrupted, that call with throw an exception. No need to catch it-- the exception will automatically stop execution of your task and the CommandBox shell will catch the exception itself, output the text "CANCELLED" and return to the prompt.
If you need to use a 3rd party jar, we recommend you use the extra parameters to the createObject() function, which allows you to specify a list of jars to load from (this is a Lucee-specific feature). Read up on the context parameter here:
There are some scenarios however that don't work. One is if you need to use the createDynamicProxy() BIF to create CFC instances that implement Java classes that exist in an ad hoc jar. Lucee currently requires those classes to be loaded by the Lucee system classloader.
As such, CommandBox gives you a mechanism to load jars into the system class loader that was used to classload Lucee so those classes are available everywhere. This is a much better and portable solution to dropping the jars in the ~/.CommandBox/lib folder and restarting the shell.
The CommandBox CLI is implemented as a single long request in the underlying Lucee server. Due to this it is required to make a unique thread name every call to the task or else an error can occur. The following is an example you can use for running threads.
CommandBox bundles WireBox and therefore has access to the AsyncManager library that ColdBox MVC has. It can be used to create async code and even scheduled tasks. CommandBox uses the AsyncManager internally for timed screen redraws.
You can access the AsyncManager class in the variables scope or call the
This method on the shell object will clear all text off the screen and redraw the CommandBox prompt.
This shell method returns the number of characters wide that the terminal is. Can be useful for outputting long lines and making sure they won't wrap.
This shell method returns the number of characters tall the terminal is. Can be useful for outputting ASCII art.
print.columns(
    directoryList( resolvePath( /lib ) ),
    (item,row,col)=>item.endsWith('.txt') ? 'blue' : 'green'
)printColumns data="1,2,3,4,5" delimiter=","
# or ...
ls --simple | printColumns~/.CommandBox/engine/cfml/cli/lucee-server/deploy// MySQL JDBC Extension
installExtension( '7E673D15-D87C-41A6-8B5F1956528C605F' )// MySQL JDBC Extension
installExtension( '7E673D15-D87C-41A6-8B5F1956528C605F', '8.0.30' )TLSmail
subject=subject
from=from
to=to
cc=cc
bcc=bcc
replyTo=replyTo
type=type
server=server
port=port
username=username
password=password
useTls=tls
usessl=ssl
async=false {
writeOutput(emailBody);
};finally {} block for those items.checkInterrupted();arguments[ 1 ]arguments.[ 2 ]If your task accepts a file or folder path from the user, you'll want to resolve that path before you use it. To do this, use the fileSystemUtil object that is available to all tasks via the BaseTask class. The method resolvePath() will make the file system path canonical and absolute. This ensures you have a fully qualified path to work with even if a user might passed a folder relative to their current working directory passed something like ../../.
If you run that task and pass a full file path such as C:\sandbox\testSite, you would get that exact same path back as the output.
However, if you changed the interactive shell to the C:\sandbox directory and then ran the task with testsite as the input, the relative path would now still resolve to C:\sandbox\testSite.
If, from the same directory, you passed testsite/foo/bar/../../, you would still get C:\sandbox\testSite as the path.
task run :foo=bar :baz=bumerror()Or with an exit code:
If you want your task to set a failing exit code, but you don't have a message to go with it, you can also simply return the exit code you want using the return keyword.
error( "I don't like your tone of voice" );error( message="prepare to be deleted", exitCode=666 );function run() {
if( condition ) {
print.greenLine( 'Well that was easy' );
} else {
return 1;
}
}The setting defaults to false.
config set taskCaching=trueModules aren't unloaded for you. You can do so via ModuleService.unload( 'myUtils' ) if you like.
If a module of that name is already loaded, nothing happens. That means if you modify the module, you'll need to reload the shell to pick up those changes.
The path to the module can be absolute, but if relative, it will be resolved relative to the task runner CFC, not the current working directory of the shell.
A task runner with an entire folder of modules to load may run into timing issues where one module requires another to be loaded before it can load. To handle this, instead of loading each module one at a time with loadModule() you can load an entire array of modules at ones with loadModules().
First all modules in the array are registered with the ModuleService.
Then each module is activated
This function takes an array of absolute module paths to load.
You can easily drive this function with directoryList() like so:
loadModule( 'build/modules/myUtils' );component {
function run( String directory ) {
// This will make each directory canonical and absolute
directory = fileSystemUtil.resolvePath( directory );
print.line( directory );
}
}loadModules( [
"C:/path/to/module1",
"C:/path/to/module2",
"C:/path/to/module3"
] );loadModules(
directoryList( path=resolvePath( 'modules/' ), type='dir' )
);To load up your custom jars on the fly, call the classLoad() method which is available in any custom command or Task Runner.
You can pass either an array or list of:
Directories - All jar and class files will be loaded from each directory recursively
Jar files - Each jar file will be loaded
Class files - Each class file will be loaded
Note, paths need to be absolute when you pass them in! Here's some more examples.
classLoad( 'D:/amqp-client-5.1.2.jar' );classLoad( 'C:/myLibs,C:/otherLibs' );
classLoad( [ 'C:/myLibs', 'C:/otherLibs' ] );
classLoad( 'C:/myLibs/myLib.jar,C:/otherLibs/other.class' );
classLoad( [ 'C:/myLibs/myLib.jar', 'C:/otherLibs/other.class' ] );async()You can find the full documentation here:
And the API docs here:
var threadName = createGUID();
cfthread( action="run" name=threadName) {
  //Thread body
}
cfthread( action="terminate" name=threadName);// Parallel Executions
async().all(
() => hyper.post( "/somewhere" ),
() => hyper.post( "/somewhereElse" ),
() => hyper.post( "/another" )
).then( (results)=> logResults( results ) );In the previous section, we built our first task and executed it. Let's take a look at how the simple conventions work for task runners.
The task run command will look for a default task name of task.cfc in the current working directory. The default target (or method) is called run. Therefore, when you run
you will execute the run() method of ./task.cfc relative to your current working directory.
A task is just a CFC file. The task CFCs will extend the commandbox.system.BaseTask class, but it isn't necessary for your to extend it manually. CommandBox will add in virtual inheritance for you. The task CFCs can live wherever you want in your project (or outside of it!) and can have any name you wish. Since tasks are not scanned and registered by CommandBox, but rather created on-the-fly by convention, you don't have to worry about more than one task in different projects with the same name. That means, each of your projects can have a workbench/build.cfc task runner and they won't collide. When you run the task, the correct CFC will be located based on your current working directory. Therefore, tasks are not "global" like commands, but rather in the context of a given project or folder.
myTaskName.cfc
To call the above task, we'd reference the path to where the CFC lives. It isn't necessary to include the .cfc part of the name, though we'll forgive you if you do!
You can have as many targets in your task as you wish, by simply declaring public methods. A task can have no parameters or as many as you like. Default argument values will be used as well. It's just a method execution, but from the command line!
build.cfc
To run each of the targets above, you'd type this:
All CFCs including tasks are created and wired via WireBox, so dependency injection and AOP are available to them. This can be handy for tasks to wrap services provided by models, or to access utilities and services inside CommandBox.
This task would inject CommandBox's ArtifactService to list out all the packages being stored.
Tasks also have a variables.wirebox variable as well as their own getInstance() method which proxies to WireBox to get objects.
Task Runners do not execute a application.cfc or application.cfm, but you can use the tag (or script variant: application) to modify the properties and behaviors of the Task Runner application. Any setting that can be modified using can be modified in Task Runners as follows:
You can also define mappings as follows:
NOTE: The settings that are changed using cfapplication will last for the duration of the CLI shell and will affect any and all code run from the CLI including the CommandBox core code.
To send email, use the cfscript variant of cfmail making sure you set async=false (see below). Not setting this flag to false may result in undelivered email because mail may still exist in Lucee spooler (Lucee tasks) when your task runner exits.
A task target can defined as many method arguments as it wants which can be passed in via command arguments when calling the task.
fun.cfc
There's two ways to pass in the name and verbose parameters: positionally and via named parameters.
If you want to pass your parameters positionally, you must include the task and target name.
A more self-documenting method is to use named parameters. Note, it is not necessary to pass the task and target name when using named parameters, but in this case, my example does not use the default task and target convention names, so I'll need to pass them anyway. Note that we start each parameter name with a colon (:) so they don't interfere with any of the parameters to the actual task run command.
The parameters :name and :verbose will be passed directly along to the task as name and verbose.
Tasks with boolean parameters can also have those passed using flags just like commands. Simply prepend a colon (:) to the name of the flag like so.
Since task run is just a regular command, remember its parameters don't have to be hard coded. They can expressions or system settings, etc.
When you need to download a file from HTTP(S) in a Task Runner, you'll want to use our progressable downloader helper. It has several advantages over a basic HTTP call:
Automatically uses any configured proxy settings
Doesn't lock the CLI during download but shows a handy progress bar to the user.
Can be interrupted with Ctrl-C for very large downloads that the user wants to cancel.
If the remote server doesn't send a content length header (like S3 cloudfront) then instead of a progress bar, you'll just see a climbing file size that shows how much as been downloaded so far.
To use the progressable downloader, ask WireBox to inject the following two CFC instances into your Task Runner:
Then, when you're ready to download, use them like so:
That will download the file and place it in the local path. The closure is a callback that updates the progress bar as the file downloads. It is decoupled this way so you could make your own progress bar if you wanted.
The result variable contains the following struct.
An error will be thrown if the status code is less than 200 or greater than 399. The progressable downloader will follow 301 and 302 redirects automatically. If you want to track this, you can add an additional listener closure which is called for every redirect.
If you're touching Java, there's probably some property files in your future. We've included the PropertyFile module in CommandBox that you can call directly from CFML. There are also some commands so you can script the creation and updating of property files from the command line and CommandBox recipes.
propertyFile show foo.properties
propertyFile set propertyFilePath=foo.properties newProp=newValue
propertyFile clear foo.properties newPropA propertyFile CFC instance can also be treated as a struct as it stores the properties in its this scope.
One very handy thing can be to write tasks to perform database manipulations. Your code is executed on Lucee Server 5.2 which is the version of Lucee that the core CLI runs on. The CLI has the full power of a Lucee server running under the covers, but there's no web-based administrator for you to acess to do things like adding datasources for your scripts to use. It would considered poor form anyway since standalone scripts are best if they're self-contained and don't have external dependencies like server settings necessary to run.
So the easiest way to accomplish this is simply to exploit a little known but very cool feature of Lucee that allows the datasource attribute of most tags to be not only a string which contains the name of the datasource, but also a struct that contains the definition of the datasource. This will create an on-the-fly connection to your database without any server config being necessary which is perfect for a stand-alone script. Here is what that looks like. Note, I'm using
When writing a Task that needs to iterate some predefined amount of work that might take some time, you can now tap into the Progress Bars in CommandBox easily for your own purposes.
There are two different progress bars in CommandBox. One specifically for downloading files, and a generic one.
Here is how you can download a file in a Task Runner and have a progress bar animation that contains all the usual data such as download speed and file size. The progressable downloader will automatically take any HTTP proxy settings into account.
CommandBox has a powerful utility that can be used to watch a folder of files for changes and fire arbitrary code when changes happen. The utility will block execution of the task until the user stops it with Ctrl+C. To use a watcher in your task, there is a method called watch() in the base task class that you can call. It has a nice DSL of chainable methods to configure it.
Here's a rundown of the methods used above in the DSL.
paths( ... ) - Receives one or more globbing patterns to watch for changes. Pass each globbing pattern as a separate argument. (defaults to **)
task runcomponent{
function greet( string name, boolean verbose ){
print.line( 'Well, hello there #name#!' );
if( verbose ) {
print.line( "You're looking quite well today." );
}
}
}task run fun greet Brad false// Create and load property file object
propertyFile( 'myFile.properties' )
.set( 'my.new.property', 'my value' )
.store();
// Get a property
var value = propertyFile( 'myFile.properties' )
.get( 'existing.property' );
// Create one from scratch
propertyFile()
.set( 'brad', 'wood' )
.store( 'myFile.properties' );// Create object
var propFile = propertyFile( 'myFile.properties' );
// Access proeprties
print.line( propFile.brad );
// Change/add properties
propFile.foobar = true;
propFile[ 'another.new.property' ] = false;
// Save it
propFile.store();You can print hierarchical data as an ASCII tree, like how the package list command works by using the print.tree() helper. The tree() helper accepts a top level struct where each key will reprent a top level branch in the tree using the name of the key. If the value of the key is a nested struct, items will be nested below based on the keys in that struct. For a leaf node (no children), the key can have an empty struct or an empty string as the value.
The tree helper will obey the order of the keys, so use ordered structs if the order of output is important to you.
print.tree(  [
	'Ortus Solutions' : [
		'Products' : [
			'Open Source' : {
				'ColdBox MVC' : {},
				'CommandBox CLI' : {},
				'ContentBox CMS' : {},
				'WireBox' : {},
				'TestBox' : {},
				'CacheBox' : {}
			},
			'Commercial' : {
				'ForgeBox Pro' : {},
				'CommandBox Pro' : {},
				'CommandBox Service Manager' : {},
				'TimeBox BMP' : {}
			}
		],
		'Services' : {
			'Consulting' : {
				'Ad-Hoc hours' : {},
				'Hourly Retainer' : {},
				'Custom' : {}
			},
			'Training' : {},
			'Design' : {}
		},
		'Employees' : {
			'Luis' : {},
			'Brad' : {},
			'Gavin' : {},
			'Eric' : {},
			'Jon' : {},
			'Jorge' : {},
			'Edgardo' : {}
		}
	]
] )
which outputs the following:
The tree() method also accepts a second argument which is a closure that is called for every item in the tree, returning a string to influence the formatting of that item. The closure receives
All parent keys concatenated as a single string
All parent keys as an array
So, for example, if you were outputting a tree view of file listings, where the top level key was C:/ and next level was Windows/ and the leaf node was foo.txt, the string version of the key path would be C:/Windows/foo.txt as passed to the closure. You can use the hierarchy to color entire parts of the tree if you wish. e.g., all items with the prefix C:/Windows/ are blue, etc.
There is no CLI equivalent to this helper since generating the input data in the needed format would be a little difficult.
inDirectory( ... ) - Set the base directory that the file globs are relative to. (defaults to current working directory)
withDelay( ... ) - Set the number of milliseconds between polling the file system. (defaults to 500 ms)
onChange( ... ) - Pass a closure to be executed when a change has occurred.
start() - Starts the watcher. Always call this at the end of the DSL chain
If you don't care what the change was then you don't need to define any arguments to your closure. However, each time your closure is called, there is a struct of data passed to it that defines what paths were added removed and changed. The data is the format of:
The arrays will contain the corresponding file paths. For example, if the removed array is empty, it means no files were removed. There should be at least one file path in at least one of the 3 arrays.
watch()
    .paths( '**.cfc' )
    .excludePaths( '/config/Coldbox.cfc,/config/WireBox.cfc' )
    .inDirectory( getCWD() )
    .withDelay( 5000 )
    .onChange( function() {

        print.line( 'Something changed!' );
        command( 'testbox run' )
            .run();

    } )
.start();component {
function run() {
// Do awesome task stuff here
}
}task run path/to/myTaskNamecomponent {
function createZips() {
print.line( 'Zips created!' );
}
function compileAssets(){
print.line( 'Assets Compiled!' );
}
function minimizeJS(){
print.line( 'JS Minimized!' );
}
}task run build createZips
task run build compileAssets
task run build minimzeJScomponent {
property name='artifactService' inject='artifactService';
function run(){
var results = artifactService.listArtifacts();
for( var package in results ) {
print.boldCyanLine( package );
}
}
}var results = getInstance( 'artifactService' ).listArtifacts();// to create a datasource, first get the application settings
appSettings = getApplicationSettings();
// initialize with the current value of application datasources
dsources = appSettings.datasources ?: {};
// add a new datasource to it
dsources[ 'myNewDS' ] = { ... };
// call cfapplication (cfscript variant) to update the datasources and set AWS S3 credentials
application action="update" datasources=dsources s3={} /* and any other settings */ ;fileSystemUtil.createMapping( name, physicalpath );task run taskFile=fun target=greet :name=Brad :verbose=falsetask run --no:verbose
or
task run --!:verbosetask run ${APIDocURL} ${APIDocPort:8080}
task run taskFile=build :message=`cat message.txt`└─┬ Ortus Solutions
├─┬ Products
│ ├─┬ Open Source
│ │ ├── CacheBox
│ │ ├── WireBox
│ │ ├── CommandBox CLI
│ │ ├── ContentBox CMS
│ │ ├── TestBox
│ │ └── ColdBox MVC
│ └─┬ Commercial
│ ├── ForgeBox Pro
│ ├── CommandBox Service Manager
│ ├── TimeBox BMP
│ └── CommandBox Pro
├─┬ Services
│ ├── Training
│ ├── Design
│ └─┬ Consulting
│ ├── Hourly Retainer
│ ├── Ad-Hoc hours
│ └── Custom
└─┬ Employees
├── Brad
├── Gavin
├── Edgardo
├── Jorge
├── Eric
├── Luis
└── Jon
{
  'added':[],
  'removed':[],
  'changed':[]
}watch()
.onChange( function( paths ) {
print
.line( '#paths.added.len()# paths were added!' )
.line( '#paths.removed.len()# paths were removed!' )
.line( '#paths.changed.len()# paths were changed!' ) ;
} )
.start();queryExecute()cfquerySo, the first block simply declares a struct that represents a datasource connection. Then I use that struct as my datasource. You might be thinking, "where the heck did he get that struct??". Glad you asked. Start up a Lucee 4 server, edit a datasource that has the connection properties you want and then at the bottom of the edit page you'll see a code sample you can just copy and paste from. This is the code for an Application.cfc, but you can re-use the same struct here.
If you want to just create a "proper" datasource that you can reference by name, Lucee has some more tricks up its sleeve for this. You can simulate the same thing that happens when you add a datasource to your Application.cfc with the following code. This will define a datasource for the duration of the time the CLI is running in memory, but it will be gone the next time you start the CLI.
So let's break this down real quick. First we get the current settings of the CLI Lucee context and the list of current databases (may be null). Then we simply add the same datasource definition as above to the struct with the name we wish to use to reference this datasource. And finally we update the application with the new struct of datasources. Now we can use this datasource name just we would in a "normal" web application.
The internal CLI of CommandBox runs on Lucee 5 so make sure you copy the data source definitions from a Lucee 5 server. Also, you'll note I used encrypted passwords above. You can also just put the plain text password in. Just omit the encrypted: text like so:
If you are getting SSL related exceptions when trying connecting to an MS SQL database using the Microsoft SQL Server (JDBC4) driver (com.microsoft.sqlserver.jdbc.SQLServerDriver), try using the jTDS driver (net.sourceforge.jtds.jdbc.Driver) instead.
You can also use a generic progress bar for any purpose. It is up to you to update the progress bar with the current percentage. If you are inside of an Interactive Job, the progress bar will automatically show at the bottom of the job output.
The currentCount and totalCount parameters to the update() method are optional. They will show in the output only if you provide them.
You can remove the progress bar from the screen at any time with clear().
You can show the bar again at any percentage simply by calling the update() method. No need to initialize anything. The progress bar object carries no state.
progressBarGeneric.clear();property name="progressableDownloader" inject="ProgressableDownloader";
property name="progressBar" inject="ProgressBar";var result = progressableDownloader.download(
'http://site.com/fileToDownload.zip',
'C:/path/to/fileWeDownloaded.zip',
// This callback fires every 1024K of downloaded bytes
function( status ) {
progressBar.update( argumentCollection = status );
}
);{
responseCode,
responseMessage,
headers // struct
}When developing a task, you may find the need to run another task. To do this, we have provided you with a DSL you can use to call any task. The Task DSL is very similar to the Command DSL, but designed to delegate to the task run command for you.
The DSL is a sequence of chained methods that will always start with task() and end with .run(). The run method tells the DSL that you are finished chaining methods and that the task should be executed. Here is the simplest possible example:
ds = {
  class: 'org.gjt.mm.mysql.Driver',
  connectionString: 'jdbc:mysql://localhost:3306/bradwood?useUnicode=true&characterEncoding=UTF-8&useLegacyDatetimeCode=true',
  username: 'root',
  password: 'encrypted:bc8acb440320591185aa10611303520fe97b9aa92290cf56c43f0f9f0992d88ba92923e215d5dfd98e632a27c0cceec1091d152cbcf5c31d'
};

var qry = queryExecute( sql='select * from cb_role', options={ datasource : ds } );

for( var row in qry ) {
  echo( row.role & chr( 10 ) );
}appSettings = getApplicationSettings();
dsources = appSettings.datasources ?: {};
dsources[ 'myNewDS' ] = {
class: 'org.gjt.mm.mysql.Driver',
connectionString: 'jdbc:mysql://localhost:3306/bradwood?useUnicode=true&characterEncoding=UTF-8&useLegacyDatetimeCode=true',
username: 'root',
password: 'encrypted:bc8acb440320591185aa10611303520fe97b9aa92290cf56c43f0f9f0992d88ba92923e215d5dfd98e632a27c0cceec1091d152cbcf5c31d'
};
application action='update' datasources=dsources;
var qry = queryExecute( sql='select * from cb_author', options={ datasource : 'myNewDS' } );
for( var row in qry ) {
echo( row.firstName & chr( 10 ) );
}username: 'root',
password: 'clear text password'component {
property name="progressBarGeneric" inject="progressBarGeneric";
function run() {
// Draw initial progress bar
progressBarGeneric.update( percent=0 );
// Update as we progress
sleep( 1000 );
progressBarGeneric.update( percent=25, currentCount=250, totalCount=1000 );
sleep( 1000 );
progressBarGeneric.update( percent=50, currentCount=500, totalCount=1000 );
sleep( 1000 );
progressBarGeneric.update( percent=75, currentCount=750, totalCount=1000 );
sleep( 1000 );
// Progress bar automaticaly hides once it reaches 100%
progressBarGeneric.update( percent=100, currentCount=1000, totalCount=1000 );
}
}progressBarGeneric.update( percent=27 );progressableDownloader.download(
downloadURL,
localPath,
function( status ) {
progressBar.update( argumentCollection = status );
},
function( newURL ) {
print.line( "Redirecting to: '#arguments.newURL#'..." );
}
);This would run a task.cfc in the current working directory and the output would be flushed to the console.
Here are all the possible DSL methods that we'll unpack below:
This is required to be the first method you call. It creates an instance of the TaskDSL class and returns it. It accepts a single parameter called taskFile which is the path of the task CFC you wish to run. Just like the task run command, you can supply a full path or a relative path. The .cfc extension is also optional. If you don't pass in a task CFC name, it defaults to task.
Use this method to override the default task target of run.
This method is used to pass parameters to your command. You can pass named or positional parameters to this method, and they will be pass along to the command in the same fashion. There is no need to escape parameter values like you would when running a command manually from the shell.
Just like when running a task manually, flags are an optional shortcut for specifying boolean parameters. Pass in each flag as a separate argument. It is not necessary to include the -- prior to the value, but it will still work.
Control the working directory that the task runs in if you don't want it to be the current working directory of the shell.
Your DSL should always end with a run method. This executes the task. By default, the output will be sent to the console, however you can capture it by specifying returnOutput as true.
If you want to help debug the exact task that is being passed along to the shell for executing, set the echo parameter to true and the task will be echoed out prior to execution. The echoed text is not part of what gets returned.
If a task encounters an error or returns a non-zero exit code, the Task DSL will throw an exception. if you want to ignore failing tasks or rethrow an exception of your own design, you may place the task in a try/catch. The exit code of the task may be accessed via:
The ${exitCode} environment variable
The errorcode property of the exception if the error() method was used
Calling getExitCode() on the Task DSL object
task().run();task( ... )
.target( ... )
.params( ... )
.flags( ... )
.inWorkingDirectory( ... )
.run( ... );task( 'build' )
.run();
task( 'C:/path/to/task.cfc' )
.run();task()
.target( '' )
.run();
task( 'C:/path/to/task.cfc' )
.run();task( 'mytask' )
.params( path='/my/path', newPath='/my/new/path' )
.run(); task( 'mytask' )
.params( '/my/path', '/my/new/path' )
.run();args = {
"arg1": true,
"arg2": "something else"
};
task( 'mytask' )
.params( argumentCollection=args )
.run(); task( "mytask" )
.params( 'coldbox' )
.flags( 'force', '!save' )
.run();task()
.inWorkingDirectory( 'C:/' )
.run();var output = task()
.params( "My name is Brad" )
.run( returnOutput=true );
// You can optinally strip any ANSi formatting too
output = print.unANSI( output );task()
.run( echo=true );try {
var t = task( 'myTask' )
t.run();
} catch( any var e ) {
print.line( 'myTask errored with #t.getExitCode()#, but we ignoring it.' );
}The print helper contains a feature that will generate ASCII tables to print tabular data from the CLI. The easiest way to see what this looks like is to run the outdated command in the root of a project:
There are several easy ways to call the table printer. Here are the arguments to the print.table() method:
data - Any type of data for the table. Each item in the array may either be an array in the correct order matching the number of headers or a struct with keys matching the headers.
includedHeaders - A list of headers to include. Used for query inputs
headerNames - A list/array of column headers to use instead of the default
debug - Only print out the names of the columns and the first row values
Below are some basic examples that all produce the same CLI output:
You can pass an array of column headers as the first argument and then an array of rows, where each row contains an array with data for each column.
You can also pass an array of structs where the keys of the structs match the column names in the headers array.
If you have data already in a query object, you can pass that directly as the first parameter. The data parameter is ignored here.
There is some basic support for applying formatting at a cell level. To do this, use the "array" version of the data and instead of providing a string for the cell value, provide a struct containing:
value - The actual string value to print
options - A string of print helper options- typically a color or background color
The options can contain any color from the system-colors command and follows the same format as the .
You can limit the columns that display in the table regardless of whether you use an array of data or a query object by using the includeHeaders parameter. This example outputs a sorted list of the names and version of all the Lucee Extensions installed in the CLI. (extensionList() is a built in Lucee function that returns a query object)
If the data on a given row is too much to display in the given terminal, the table printer will automatically shrink columns based on how much "whitespace" is in them. Values which are too long to display will be truncated and ... will appear at the end. Here is the output of the outdated command.
If a user has a terminal so small that all the columns simply won't fit, the table printer will automatically eliminate extra columns on the right hand side of the table and insert a single column whose header and values are all ... to show missing data. Here is the output of the outdated command.
Some tasks simply do some processing, output their results, and finish executing. You may want to interact with the user or create a long-running that can be controlled by user input (See the snake game)
Use these methods made available to interact with your users
The ask() task will wait for the to enter any amount of text until a line break is entered. A message must be supplied that lets the user what you'd like to receive from them. The task will return their response in a string variable.
You can mask sensitive input so it doesn't show on the screen:
You can also put default text in the buffer for a wizard-style interface where the user can simply hit "enter" to accept the visible default values.
If you just need a single character collected from a user, or perhaps any keystroke at all, use the waitForKey() method. A message must be supplied that lets the user know what you need. This method can capture a single standard character and also has some special (multi-char) return values that represent special key presses.
If the return is not a single character, it will be one of the following special strings:
key_left
- Left arrow
key_right -
Right arrow
key_up
- Up arrow
If you want to ask the user a yes or no question, use the confirm() method. Any boolean that evaluates to true or a y will return true. Everything else will return false. This allows your users to respond with what's natural to them like yes, y, no, n, true, or false. You must pass a question into the method and you will receive a boolean back.
Sometimes you want to collect input from the user that is constrained to a limited number of predefined options. You could have them enter via ask() as freetext, but that is more prone to errors. This is where the Multiselect input control comes in handy. It blocks just like the ask command until the user responds but allows the user to interact with it via their keyboard. Think of it like radio buttons or checkboxes. If you configure it to only allow a single response (radio buttons) then a string will come back containing the answer. If you configure it to allow multiple selections, you will receive an array of responses back, even if there was only one selection made.
Here is a simple example that uses a comma-delimited list to define the options.
Here is another example that defines the options in an array. This allows you to have different text on screen from what gets returned in the response. This sets multiple responses on so an array will come back. This also sets the input as required so the user will be required to select at least one option.
Notice how the "red" option is set as selected by default. Even though the colors will show up as "Red", "Green", and "Blue, the values will come back in the array as "r", "g" and "b" in the array.
Display and value are both both required in the array of options above. If you provide at least one of the two, the other will default to the same. A keyboard shortcut will be created for each option which defaults to the first character of the display. So for instance, pressing "R" on your keyboard will select the Red option. Pressing "G" will select Green, etc. You can override the shortcut with an accessKey setting in the struct.
Remember that while interactivity is cool, people might want to automate your tasks as part of a script that runs headlessly. Therefore you should always provide a way to skip prompts if possible.
Tasks aren't required to output anything, but if you do, use the handy print helper that lives in the variables scope. You can output ANSI-formatted text this way. All the text you output will be stored in a "buffer" and at the end of the task it will be output to the console, or piped into the next command if necessary;
The print object has an unlimited number of methods you can call on it since it uses onMissingMethod. Here are the rules.
If the method has the word "line" in it, a new line will be added to the end of the string. If the string is empty or not provided, you'll just output a blank line.
CommandBox supports 256 colors, but some terminals only support 16 or even 8. If you use a color that the terminal doesn't support, it will be adjusted to the next closest color. If the method has one of the names of a supported color in it, the text will be colored. Here are the basic 16 color names:
Black
Maroon
Green
Olive
To view all the color names run the system-colors command.
If the method has a valid color name preceded by the word "on", the background of the text will be that color.
onBlack
onRed
onGreen
onYellow
When you run the system-colors command, you'll see that each of the 256 colors have a number. You can reference a color like so:
If any of the following words appear in the method, their decoration will be added. Note, not all of these work on all ANSI consoles. Blink, for instance, doesn't seem to work in Windows.
bold
underscored
blinking
reversed - Inverse of the default terminal colors
indented isn't part of the ANSI standard but rather a nice way to indent each line of output with two spaces to help clean up nested lines of output. If the string being passed in has carriage returns, each of them will be preceded by two spaces.
Any combination of the above is possible. Filler words like "text" will simply be ignored so you can make your method nice and readable. Get creative, but just don't overdo it. No one wants their console to look like a rainbow puked on it.
Some times you want to apply formatting at run time. For instance, show a status green if it's good and red if it's bad. You can pass a second string to the print helper with additional formatting that will be appended to the method name.
Depending on the value of the status variable, that line would be the same as one of the following two lines:
If you have a task that takes a while to complete and you want to update the user right away, you can flush out everything in the buffer to the console with the .toConsole() method. Note, any text flushed to the console cannot be piped to another command.
All the methods in the print object can be chained together to clean up your code.
If you have a string that contains ANSI formatting and you want to strip it out to just plain text, there is a function on the print helper to do this for you.
If a task runner has methods of this name, they will be executed automatically.
preTask - Before any target in the task
postTask - After any target in the task
aroundTask - Wraps execution of any target in the task
Much of the functionality available to you in task runners comes via inheritance from the super class that all tasks extend. Even if you don't have an extends attribute, CommandBox uses the power of WireBox virtual inheritance to apply the super class.
The see most up-to-date list of all methods and properties from the base classes, check the API docs:
Here is an over view of common methods available to every task from the base classes
Sometimes you have a task that will run for a while or just produce a lot of logging output as it executes to let the user know what's going on. it is very easy to keep the user up to date with the print helper like so:
This can create a lot of output however which can look a little messy. Plus if you have a task that runs another task or command, all the output from each steps gets mixed together. This is where Interactive Jobs help you harness the power of redrawing the console over and over to nicely format what steps have completed and have logging for each step that goes away once the step is complete.
Interactive Jobs are best if you have a small enough number of jobs that they can all fit on one screen. Since the output of the jobs is updated in real time, it doesn't scroll past the bottom of the terminal and CommandBox will just truncate any extra text.
var favoriteColor = ask( 'WHAT, is your favorite color??' );

if( favoriteColor == 'red' ) {
    print.boldRedLine( 'AAAAHHHHHH!!!!' );
} else if ( favoriteColor == 'I mean blue' ) {
    print.line( 'Obscure Monty Python reference' );
}
key_down
- Down arrow
back_tab
- Shift-tab. (Regular tab will come through as a normal tab char)
key_home
- Home key
key_end
- End end
key_dc
- Delete
key_ic
- Insert key
key_npage -
Page down
key_ppage
- Page up
key_f1
- F1 key
key_f2
- F2 key
key_f3
- F3 key
key_f4
- F4 key
key_f5
- F5 key
key_f6
- F6 key
key_f7
- F7 key
key_f8
- F8 key
key_f9
- F9 key
key_f10 -
F10 key
key_f11
- F11 key
key_f12
- F12 key
esc - Escape key
Navy
Magenta
Cyan
Silver
Grey
Red
Lime
Yellow
Blue
Fuchsia
Aqua
White
onBlue
onMagenta
onCyan
onWhite
etc...
concealed
indented
pre<targetName> - Before a specific target (Ex: preRun)
post<targetName> - After a specific target (Ex: postRun)
around<targetName> - Wraps execution of a specific target (Ex: aroundRun)
onComplete - Fires regardless of exit status
onSuccess - Fires when task runs without failing exit code or exception
onFail - Fires if exit code is failing after the action is done (always fires along with onError, but does not receive an exception object). Use this to respond generally to failures of the job.
onError - fires only if an unhandled exception is thrown and receives exception object. Use this to respond to errors in the task. Does not fire for interrupted exceptions
onCancel - Fires when the task is interrupted with Ctrl-C
Every event receives the following data:
target - The name of the target executing
taskArgs - A struct containing the arguments for the target method
The onError event receives this additional data:
exception - The cfcatch object
The aroundTask and around<target> events receive the this additional data:
invokeUDF - A UDF to invoke to call the actual target method
A simple “around” event looks like this:
A more complex one, like this:
It is important to return any value received from the invokeUDF() method (may return null) in case the original target returns an exit code. Otherwise, a failing exit code returned by the target will be ignored!
If you wish to modify the incoming arguments to the target, you may modify the taskArgs struct, which is passed by reference. It is not necessary to pass anything into the invokeUDF() method call.
Control when lifecycle method fire with these this scoped variables in the task CFC. These are all comma-delimited lists. When empty, they are ignored. When at least one target name is specified in “only”, then ONLY those targets will have the corresponding event fire. Any targets listed in the “except” settings, will not fire. These settings apply to the primary target being executed as well as any 'depends” targets.
When one target depends on other targets, it makes sense for pre and post events to fire, but it doesn’t make sense for onComplete, onFail, onSuccess, onError, or onCancel to fire for each one since those are “final” events. As such, the following will only fire for the top level target being executed. (Keep in mind, if a “depends” target fails, the error will bubble up to the top level.
onError
onSuccess
onFail
onComplete
onCancel
If an aroundTask and around<target> method are both specified, they will both execute with the task-level one (more generic) wrapped “around” the target level one (more specific).
To clarify the order of execution, here is the output from a successful task running a “run” target that has every possible method above defined.
ColdBox notes: this feature is modeled after the pre/post/around features of ColdBox event handlers where a Task is analogous to a handler and a target is analogous to an action. There are some differences in how CommandBox’s pre/post/around events were implemented.
ColdBox does not allow an aroundhandler and around<action> at the same time, but CommandBox does allow an aroundTask and around<target> at the same time.
ColdBox executes pre/post before and after the around events. CommandBox wraps the pre/post code with the around code. This means, for example, exceptions raised by a preTask or postTask method can be try/caught in the aroundTask method.
For around methods, ColdBox passes a direct reference to the original action UDF to invoke and all the original arguments must be passed along by argumentCollection. CommandBox passes a special invoker UDF to around methods which does not require any arguments as it internally calls the original target method with the necessary arguments. This reduces boilerplate. In both cases, the return value of the UDF needs to be dealt with appropriately.
response = ask( message='What is your password?', mask='*' );response = ask( message='Enter installation Directory: ', defaultResponse='/etc/foo/bar` );var keyPress = waitForKey( 'Press any key, any key.' );
print
.line()
.line( 'My magic tells me you pressed: #keyPress#' );if( confirm( 'Do you like Pizza? [y/n]' ) ) {
print.greenLine( 'Good for you.' );
} else {
print.boldRedLine( 'Heretic!!' );
}var color = multiselect( 'What is your favorite color? ' )
.options( 'Red,Green,Blue' )
.ask();var colorArray = multiselect( 'What is your favorite color? ' )
.options( [
{ display='Red', value='r', selected=true },
{ display='Green', value='g' },
{ display='Blue', value='b' }
] )
.multiple()
.required()
.ask();var response = multiselect( 'What place would you like? ' )
.options( [
{ value='First', accessKey=1 },
{ value='Second', accessKey=2 },
{ value='Third', accessKey=3 }
] )
.ask();function run( required path, Boolean force=false ) {
if( arguments.force || confirm( "Are you sure? [y/n]" ) ) {
fileDelete( arguments.path );
print.redLine( "It's gone, baby." );
return;
}
print.redLine( "Chickened out!" );print.line( 'I like Spam.' );
print.line();print.magenta( 'I sound like a toner cartridge' );
print.greenText( "You wouldn't like me when I'm angry" );
print.somethingBlue( 'UHF ' );print.MistyRose3( 'Fancy colors' );print.blackOnWhiteText( 'Inverse!' );
print.greenOnRedLine( "Christmas?" );print.color221( 'I will print PaleVioletRed1' );print.boldText( "Don't make me turn this car around!" );
print.underscoredLine( "Have I made my point?" );print.boldText( "Header" )
.indentedLine( "Detail 1" )
.indentedLine( "Detail 2" )
.indentedLine( "Detail 3" );print.redOnWhiteLine( 'Ready the cannons!' );
print.boldRedOnBlueText( "Test dirt, don't wash." );
print.boldBlinkingUnderscoredBlueTextOnRedBackground( "That's just cruel" );print.text( status, ( status == 'running' ? 'green' : 'red' ) );print.greenText( status );
print.redText( status );print.Line( 'Step 1 complete' ).toConsole();
print.Line( 'Step 2 complete' ).toConsole();
print.Line( 'Step 3 complete' ).toConsole();print.whiteOnRedLine( 'ERROR' )
.line()
.redLine( message )
.line();var strippedOutput = print.unANSI( formattedOutput );function aroundTask() {
return invokeUDF();
}function aroundTask( string target, struct taskArgs, any invokeUDF ) {
print.line( 'aroundTask before #target#' );
local.result = invokeUDF();
print.line( 'aroundTask after #target#' );
if( !isNull( local.result ) ) {
return local.result;
}
}function aroundTask( string target, struct taskArgs, any invokeUDF ) {
// Override incoming parameter
taskArgs.foo='bar';
return invokeUDF();
}this.preTask_only='';
this.preTask_except='';
this.postTask_only='';
this.postTask_except='';
this.aroundTask_only='';
this.aroundTask_except='';
this.onComplete_only='';
this.onComplete_except='';
this.onSuccess_only='';
this.onSuccess_except='';
this.onFail_only='';
this.onFail_except='';
this.onError_only='';
this.onError_except='';
this.onCancel_only='';
this.onCancel_except='';aroundTask prior to invokeUDF()
preTask
aroundRun prior to invokeUDF()
preRun
Task execution here
postRun
aroundRun after invokeUDF()
postTaskwirebox - WireBox injector
CR - carriage return ( char(10) )
formatterUtil - Formatter Utility
fileSystemUtil - File System Utility
shell - CLI Shell class
print - Print helper
logBox - LogBox factory
logger - LogBox logger named after this CFC
parser - CLI Parser class
configService - Config Setting Service
SystemSettings - System Setting helper
job - Interactive Job
thisThread - A reference to the current running java.lang.Thread
asyncManager - WireBox's AsyncManager class
Here is an over view of common methods available to every task from the base classes
jobThe log messages will show up in the order they appear, but once you complete the job, the log messages are hidden and only a single, green line shows to represented the completed job regardless of how many steps it had in the meantime. Do not output normal text with the print helper if possible. Once you've started the job, use the job.addLog() calls.
The final output of the above code would be this green text:
You can log the individual steps of your job for instant user feedback:
Feel free to add ANSI formatting to your log messages, but we have some convenience method for you already.
By default, a job will only show the last 5 log lines to keep things tidy. Configure this when you start the job.
All good things must come to an end. use the complete() method to show that your job has finished successfully. use the error() method to show your job has ended but with issues.
The job.error() method can take an optional message to describe what happened which will remain on the screen. If a Task Runner has an unhandled error or the user interrupts execution with Ctrl-C, CommandBox will end the job for you as an error. The exception message will be passed to the job.error() call for you so the user can see what happened.
If you want to have a verbose mode in your task that dumps out all the log messages at the end you can do that by passing dumpLog as true in your job.complete() or job.error() calls. This is great for debugging tasks that ran on a CI server. This dumps ALL logging lines regardless of what your logSize was set to. logSize is only used for the interactive output during execution to keep things clean.
Ok, so here is where it really gets cool. Let's say you have a Task Runner that starts a server, which in turn installs a new Adobe CF engine. That's 3 jobs all nested inside of each other. You can call job.start() at any time, and the Interactive Job handler will keep a call stack of what's going on. Log messages always get added to the last job to be started. (Last In, First Out)
The output of this is:
Here we have two nested jobs. The first two lines would be red representing the outer failed job and it's failure message. The 3rd indented line would be green representing the nested job that completed successfully.
And if we add dumpLog to each job, what do we get?
Interactive jobs are fully compatible with progressable downloaders as well as the multi-select input control. Any progress bars will display at the bottom of the job output and disappear when complete.
If for some reason you need to call an external process that outputs text that you can't control and funnel through a job or you need to stop and ask the user a question with the ask() function, you can temporarily clear out output from all current jobs.
All the output will come back the next time you call a job method.
Check if there is currently a job running like so:
If there are several nested jobs currently running and something catastrophic happens and you just want to mark all the in progress ones as errors without necessarily knowing how many are still currently running you can do this:
This can be handy to call from some high level error handling that can catch errors from tasks/commands/functions several layers deep. It's basically your escape hatch.
Many times when developing a task, you find the need to run another, existing command. To do this, we have provided you with a DSL you can use to call any command, pass parameters, and even pipe commands together.
The DSL is a sequence of chained methods that will always start with command() and end with .run(). The run method tells the DSL that you are finished chaining methods and that the command should be executed. Here is the simplest possible example:
This runs the version command and the output will be flushed to the console.
We can also run commands that exist outside of Commandbox. This will run 'git --version':
Here are all the possible DSL methods that we'll unpack below:
This is required to be the first method you call. It creates an instance of the CommandDSL class and returns it. It accepts a single parameter called name which is the name of the command you wish to run. Type the name exactly as you would in the shell including the namespace, if applicable.
This method is used to pass parameters to your command. You can pass named or positional parameters to this method, and they will be pass along to the command in the same fashion. There is no need to escape parameter values like you would when running a command manually from the shell.
Just like when running a command manually, flags are an optional shortcut for specifying boolean parameters. Pass in each flag as a separate argument. It is not necessary to include the -- prior to the value, but it will still work.
You may redirect the output of a command to a file (normally accomplished by > and >>) by chaining the append() or overwrite() methods. These are mutually exclusive.
Control the working directory that the command runs in if you don't want it to be the current working directory of the shell.
Piping is a very powerful way to combine multiple commands and is accomplished via the pipe method. This method expects to receive another CommandDSL instance. You do not need to call run() on the nested command. This example is the equivalent to echo "hello\nworld" | grep lo.
You can have more than one pipe() method. Each piped command will be called in order, receiving the output from the previous one.
The above is the equivalent of
Your DSL should always end with a run method. This executes the command. By default, the output will be sent to the console, however you can capture it by specifying returnOutput as true.
If you want to help debug the exact command that is being passed along to the shell for executing, set the echo parameter to true and the command will be echoed out prior to execution. The echoed text is not part of what gets returned or piped.
You may want to manually pipe data into the command (which is the same as passing it as the first parameter. Do so with the piped parameter to the run method.
If you try to pass a shell expansion into a command, it won't work since the CommandDSL escapes all your special characters. This example doesn't work because the special characters are escaped. So the exact text is printed out and it's not possible to have it evaluated.
You can ask the CommandDSL to treat your parameters as 'raw' so they are just passed along. This allows them to include system setting expansions and CommandBox backtick expressions. Make sure that you escape any special chars yourself in this mode just like you would if typing the parameters from the shell.
There are also setter methods for each of the run() parameters.

─┬ commandbox.system.BaseCommand - Base task for all custom commands
 └─┬ commandbox.system.BaseTask - base task for all task runners
└── task - Your custom task runner// Returns the AsyncManager class
async()
// Convenience method for getting stuff from WireBox
getInstance( name, dsl, initArguments={}, targetObject='' )
// Retuns current exit code
getExitCode()
// Sets exit code to be returned when task completes
setExitCode( required numeric exitCode )
// Returns the current working directory of the shell
getCWD()
// ask the user a question and wait for response
ask( message, string mask='', string defaultResponse='', keepHistory=false, highlight=true, complete=false )
// Wait until the user's next keystroke amd return the char code
waitForKey( message='' )
// Ask the user a question looking for a yes/no response and return a boolean
confirm( required message )
// Intiator for multiselect DSL. (Check "task interactiviy" page in docs)
multiSelect()
// Run another command by name.
runCommand( required command, returnOutput=false )
// Intiator for Command DSL. (Check "running other commands" page in docs)
command( required name )
// Intiator for directory watcher DSL. (Check "Watchers" page in docs)
watch()
// This resolves an absolute or relative path using the rules of the operating system and CLI.
resolvePath( required string path, basePath=shell.pwd() )
// Intiator for globber DSL (check "Using file globs" page in docs)
globber( pattern='' )
// Intiator for PropertyFile DSL (check "property files" page in docs)
propertyFile( propertyFilePath='' )
// Report error in your task. Raises an exception that will not print the stack trace
error( required message, detail='', clearPrintBuffer=false, exitCode=1 )
// Returns true if current exit code is not 0.
hasError()
// Open a file or folder externally in the default editor for the user.
openPath( path )
// Open a URL in the user's browser
openURL( theURL, browser='' )
// Set a CommandBox environment variable
setSystemSetting( required string key, string value )
// Retrieve a Java System property or env value by name.
getSystemSetting( required string key, defaultValue )
// Retrieve a Java System property by name.
getSystemProperty( required string key, defaultValue )
// Retrieve an env value by name.
getEnv( required string key, defaultValue )
// Call this method periodically in a long-running task to check and see
// if the user has hit Ctrl-C. This method will throw an UserInterruptException
// which you should not catch. It will unroll the stack all the way back to the shell
checkInterrupted( thisThread=variables.thisThread )
// Loads up Java classes into the class loader that loaded the CLI for immediate use.
// (Check "Loading Ad hoc Jars" page in docs)
classLoad( paths )
// Get the current java.lang.Thread object
getCurrentThread()
// Get the current thread name
getThreadName()
print.greenLine( 'Step 57 complete!' );job.start( 'This is my job to run' );
sleep( 2000 );
job.complete();job.start( 'This is my job to run' );
sleep( 2000 );
job.addLog( 'Still going...' );
sleep( 2000 );
job.addLog( 'Now we''re getting somewhere.' );
sleep( 2000 );
job.addLog( 'Almost done!' );
sleep( 2000 );
job.complete();job.addLog( 'I will print white text' );
job.addSuccessLog ( ' I will print green text' );
job.addWarnLog( ' I will print yellow text' );
job.addErrorLog( ' I will print red text' );job.start( name='My job', lineSize=10 );job.start( 'I have a good feeling about this' );
if( warmFuzzy ) {
job.complete();
} else {
job.error( 'I''ve lost that loving feeling.' );
}job.complete( dumpLog=true );job.start( 'Starting server' );
job.addLog( 'This is the server name' );
job.addWarnLog( 'Hey, don''t touch that dial' );
job.start( 'Installing CF Engine first' );
job.addLog( 'This was the version used' );
job.addLog( 'Yeah, we''re done' );
job.complete();
job.addLog( 'Aaand, we''re back!.' );
job.addErrorLog( 'I think we''re going to crash' );
job.error( 'Didn''t see that coming' );job.clear();if( job.isActive() ) {
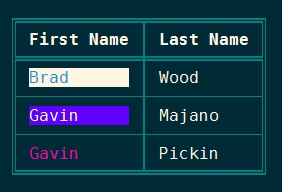
}job.errorRemaining( 'That escalated quickly!' );print.table(
headerNames = [ 'First Name', 'Last Name' ],
data = [
[ 'Brad', 'Wood' ],
[ 'Luis', 'Majano' ],
[ 'Gavin', 'Pickin' ]
]
);print.table(
headerNames = [ 'First Name', 'Last Name' ],
data = [
{ 'First Name' : 'Brad', 'Last Name' : 'Wood' },
{ 'First Name' : 'Luis', 'Last Name' : 'Majano' },
{ 'First Name' : 'Gavin', 'Last Name' : 'Pickin' }
]
);var qry = queryNew(
'First Name,Last Name',
'varchar,varchar',
[
[ 'Brad', 'Wood' ],
[ 'Luis', 'Majano' ],
[ 'Gavin', 'Pickin' ]
]
);
print.table( qry );print.table(
headerNames = [ 'First Name', 'Last Name' ],
data = [
[
{ value : 'Brad', options : 'blueOnWhite' },
'Wood'
],
[
{ value : 'Gavin', options : 'whiteOnBlueViolet' },
'Majano'
],
[
{ value : 'Gavin', options : 'DeepPink1' },
'Pickin'
]
]
);print.table(
data = extensionList()
.sort( (a,b)=>compare( a.name, b.name ) ),
includeHeaders = 'name,version'
);command( 'version' )
.run();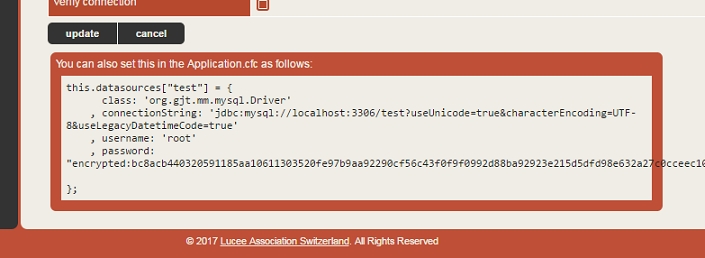

command('run')
	.params('git')
	.flags( 'version' )
.run();command( ... )
.params( ... )
.flags( ... )
.append( ... )
.overwrite( ... )
.run( ... );command( 'info' )
.run();
command( 'server start' )
.run();command( 'cp' )
.params( path='/my/path', newPath='/my/new/path' )
.run();command( 'cp' )
.params( '/my/path', '/my/new/path' )
.run();command( "install" )
.params( 'coldbox' )
.flags( 'force', '!save' )
.run();command( "cat" )
.params( "myFile.txt" )
.append( "myOtherFile.txt" )
.run();
command( "echo" )
.params( "Your new file contents" )
.overwrite( "myFile.txt" )
.run();command( "ls" )
.inWorkingDirectory( 'C:/' )
.run();command( "echo" )
.params( "hello#chr( 10) #world" )
.pipe(
command( "grep" )
.params( "lo" )
)
.run();command( "cat" )
.params( "myFile.txt" )
.pipe(
command( "grep" )
.params( "searchString" )
)
.pipe(
command( "sed" )
.params( "s/find/replace/g" )
)
.pipe(
command( "more" )
)
.run();cat myFile.txt | grep searchString | sed s/find/replace/g | morevar output = command( "echo" )
.params( "My name is Brad" )
.run( returnOutput=true );
// You can optionally strip any ANSi formatting too
output = print.unANSI( output );command( "version" )
.run( echo=true );command( "touch" )
.run( piped='myFile' );command( 'echo' )
.params( '${ os.name }' )
.run();
------------------------------------------
Output: ${ os.name }command( 'echo' )
.params( '${ os.name }' )
.run( rawParams=true );
------------------------------------------
Output: Windows 7command( 'echo' )
.setReturnOutput( true )
.setPipedInput( 'Brad' )
.setEcho( false )
.setRawParams( false )
.run( rawParams=true );